Saturday, December 26, 2009

The dollhouse

This is what the dollhouse looked like before I redecorated it. The outside was pale cream and moss green, while the inside was some horrible colours with wallpaper (very hard to remove). It took ages to sand and clean before the actual painting could start. My husband Andrew did all the prep work for me and then I took over with the painting. I must say I found it very hard doing any of the decorating work without the children finding out what I was up to in the shed.


My inspiration for the dollhouse was the Danish Lundby dollhouse, I love the modern clean lines and the good quality finish of Lundby. I was so sick of all the Barbie plastic, that 99% of this house was made from timber and most items handmade. The house is secondhand from Ebay and has been completely sanded and re-painted inside and out. Did I mention I had an absolute cow of a time trying to lug it inside on Christmas Eve? Andrew took the girls to family mass and he was gone for 1 hour, in that hour I had to get the darn thing inside, hide it AND make sure all the furniture was transported and hidden in the study. I even managed a 2nd final coat of paint on the bedroom wall before the troops came home. Ofcourse just as I got the trolley ready to lift the house out of the shed it started bucketing down, so I had to scramble around for sheets to protect the paint work. Luckily 30 minutes before everyone came home the rain slowed to a trickle and I was able to wheel the house from the shed to my bedroom doors where I could lift and slide it inside and hide it in our study cupboard. I was wet and sweating and running around like a mad woman, but made it in the end with minutes to spare.


Ofcourse I had to use some bright colours to make it a little bit of fun, this is the inside of the house.


Here is the livingroom, the couches were bought from Etsy Majeans and the fireplace & mirror (still have to hang it up) was custom made by Harry from Etsy, he also made a garden picnic table for me (not pictured) Isn't it just gorgeous? The Christmas tree in the corner has actual working lights, while the flooring is mapleleaf construction adhesive contact vinyl.


Here is the kitchen, once again contact vinyl in granite on the floor, timber table & chairs (Ebay), message chalkboard on the wall (MDF painted black, messages written in yellow pencil)
Ceiling hanging lamps (bottle spritzer tops)


Bedroom upstairs has a timber bed, bedside table and drawer unit (Ebay), some handmade paintings by me, flooring in contact adhesive vinyl and ceiling lampshade (the top of an airfreshner bottle)

The bathroom has real white mosaic tiles on the floor (the first time I've ever stuck down and grouted tiles!) A re-cycled toilet painted in white laminate paint and shower cubicle made from a re-cycled wine bottle holder that was painted white. One side has a mirror and towel rail but I still have to fix a perspex door to the front (Its ready, but I need some smaller nails) The shower head is a chrome drawer pull and the taps coloured drawing pins.


Merry Christmas and a Happy new year

Merry Christmas everyone! Phew what a busy, BUSY past few weeks, actually busy doesn't even come close to describing what its been like these last few weeks. The advent calendar was a complete hit with the girls, they loved doing their activities every 2nd day. It was tiring at times for me to set it up in advance but necessary so I had some "free" time to complete my to-do list. One thing I've learnt over the past few weeks is to make sure ALL Christmas gifts are completed and wrapped before school holidays start. I struggled to complete the dollhouse without any of the girls cottoning on what I was up to.
Here is a pic of a gingerbread house I baked and the girls decorated as part of their advent activity.
I handmade each of my daughters a fabric and felt Christmas stocking. Fabric used is Patty Young from her Mezannine range.

Don't they look lovely? I was a bit stressed getting them done in time for Christmas, but I managed in the end.


Here is the Christmas tree, decorated in Patty Young fabric baubles, paper mache baubles, ribbon and the now empty advent stockings.
I am going to take a small break from crafting and then its full steam ahead with a few baby projects, my daughter's 3rd birthday and back to school and kindy. I'll pop up the dollhouse in a seperate posting as I just realised I'll have the photo's in the wrong order (der me).
Till next time
xxxx


Monday, November 30, 2009

Advent Calendar

Yep, its THAT time of year again, Christmas is almost upon us! How quickly it has snuck up this year, but this year I managed to make and complete the Advent Calendar I promised the girls last year lol
These lovely stockings were made from felt and Patty Young fabric, from her Mezzanine range and I used one of Martha Stewart's patterns on her website.. The girls chose Green and pink as the Christmas colours this year and I fell in love with Patty's fabric the minute I saw them. Its as bright in real life as they are in the photo's.


I also painted some craft MDF letters in matching colours and once we put up the Christmas tree I'll pop some glass bowls with baubles on the mantlepiece.
Each stocking contains either an activity or lolly for each child. So 12 activities and 12 lolly filled stockings in total.

Here are some activity ideas


- Paint everybody's toenails in Christmas colours.
- Make Christmas cards.
- Make Christmas ornaments.
- Set up the Christmas tree.
- Make gift tags.
- Bake Christmas cookies and decorate them.
- Purchase a present to give to charity.
- Have a picnic for dinner.
- Go out to look at Christmas lights after dark.
- Write a letter to Santa.
- Make gifts for teachers.
- Hold a family disco with Christmas songs
- Go out somewhere special for dinner.
- Have a "decorate your own ice cream" buffet after dinner.
- Watch a Christmas movie before bed.
- baking and decorate Christmas cupcakes together
- having a tea party
- having a fondue night! chocolate and cheese dipped goodies.
- make a gingerbread house

Next time I'll pop up some photo's of the BIG Christmas stockins (have to sew them first) and the matching cloth Christmas baubles, they are so CUTE!

Saturday, November 28, 2009

Baby box and gifts for Harriet

I've just completed another baby box for baby Harriet for my friend Nic and her partner. I've used Tanya Whelan fabric from her Darla range to cover the box and a few of the handmade items such as flag bunting and re-useable wipes were also made from this fabric. The knitted rabbit in the centre of the box was inspired by Julie from Little Cotton Rabbits

Some more goodies for Harriet that I popped in a paper bag decorated with a felt birdy + tag.

Remember those felt creatures I made for Annike's birthday a few weeks back, well I used some of the softies to make this cot mobile. I have enough left to make one more for the next baby girl that is born ;-)
Anyway, I better scoot, I have just completed the Advent Calendar (felt and fabric stockings) but must still figure out what will go inside each stocking. I'll pop them up on the mantle piece today and take some pics to show you all shortly.

Sunday, November 22, 2009

Baby box and gifts for Hamish

This is a baby box I've just completed for a friends baby son. Fabric from Alexander Henry called 2D zoo blue pool. I LOVE this fabric!

Only showing the items I've made for the box, but there was a lot of lovely items made by other friends in our mother's group not shown here. From the top left hand corner is baby bunting, taggy blanket with applique letter "H", 3 x cotton T-shirts appliqued and cuffed, 3 x terry cloth wipes and bib.
Will show you the girl box I am working on once complete and then doing some more boy items.

Sunday, November 8, 2009

Happy birthday Annike

This weekend we had Annike's 5th birthday BBQ picnic party, lucky for us it was a clear and sunny 30 degree day. My inspiration was Amy Atlas, I love her tablescapes, this lady is so talented. Originally the table would have butted up against my lovely old and rustic timber shed but since it was going to be so hot it was moved against this ugly wall and I had no time to come up with a way to hide the wall in the background :-(
Food included homemade toffee apples, mini cheesecakes, mini cupcakes, coconut ice, popcorn, mint slice and various other nibblies. The letters that spell out Annike's name is MDF painted and covered in Tanya Whelan fabric from her Darla range.

For the party I made 5 lots of flag bunting which was suspended across the garden and around the outside of the house. Once again fabric by Tanya Whelan from her Darla range. I popped an old branch in a pot with sand and hung fabric (Darla fabric) and felt plushies as decoration along with the party loot boxes for guests to take home. Its a neat way to display party favours and serves as a cute decoration.

Close up of one of the plushies, I roughly put them together with the seams on the outside in keeping with the rustic casual look. Now that the party is finished I am going to convert the plushies into a baby cot mobile as a gift, but that will be elaborated on in my next blog post. ;-)


I also made homemade lemonade which I popped in these cute vintage bottles with homemade lables (fabric Tanya Whelan, even the tablecloth is from her Darla range!).
Lemonade
1 x cup of sugar
1 x cup of water
1 x cup of lemon juice
5 x cups of icy cold water
Pop 1 cup of sugar and 1 cup of water in a pot and stir occasionally on low heat till sugar has completely dissolved. Add cup of lemon juice and about 5 cups of ice cold water to make up your lemonade. Yum
And here is the cake!!! I am happy with how the cake turned out I must say, as there were a few issues in the end. Main cake is double layer Maidera cake with cherry butter cream icing, while the cupcakes were plain butter vanilla sponge topped with cherry icing. (very yummy)
Cake was meant to be topped with a blue fairy (my very 1st human figure!!), but since I forgot to pop a toothpick in her while making her (doh!) she slid off in the final stages the night before the party (double doh!!). All the cake and cupcake toppers were made over a 4 week period and stored away till decorating time. We had toadstools, worms, roses, flowers and butterflies. Cake stand was made from 3 x MDF cakeboards in various sizes and foam cake dummies all covered in Tanya Whelan Darla fabric.

As I said it was meant to be a fairy, but I forgot to make the wings FIRST, which were meant to be attached to the body while the body was still wet and BEFORE the hair goes on lol So this fairy has no wings. I also struggled with the arms and legs when I made my trail fairies, after about 6 attempts I finally was happy enough with the two faires I chose, one for the cake and one for backup. For the hair I used a clay extruder with a hole disc and just pushed out a few lots of "hair" which I attached with some water after the head had dried. I have learnt while making humans you have to do it all in bits and make sure each part you've created is very dry and hard before you go on to the next part. I made the body and legs 1st, let that dry before attaching the arms and head, then created the dress and lastly the hair.

Excuse the icing on this fairies feet, this is the culprit that slid off the cake! I liked her better as she was more naturally posed and blue to contrast with the pink of the cake, alas it wasn't meant to be. If I get time I might put a fairy tutorial together shortly, so watch this space.


Saturday, October 24, 2009

Some more crafting this week

This week has been very busy once again by way of crafting. We have a special visitor coming over and he has two lovely children (boy and girl) I was able to buy something unique for the boy but struggled for the girl so decided to make this reversable pinafore dress. My very 1st reversable dress I might add. I used some lovely Ikea fabric on one side with polka dot binding around the hem. Even the button holes went smoothly this time, I was pertified I'd stuff it up.

On the reverse side is Michael Miller red check with an applique M in lime green. The dress is not perfect (I need to practice keeping my hand steady and be a bit neater when I sew) but it fitted perfectly (actually looks better in real life, in the photo it looks a bit big).

I also made some matching flag bunting out of some fabric scraps. I love the colour combo.
Anyway, enough sewing for now, I must get back to finishing the fondant cake toppers for Annike's birthday cake, only 2 weeks left to go, yikes!


Saturday, October 17, 2009

Baby box for Kaleb

Yes its baby time again, lots of babies being born amongst my friends and this is a box I've just completed for baby Kaleb. I used fabric from Wendy Slotboom from her lilypad range which had cute little frogs on it.
Handmade fabric bunting in Wendy Slotboom fabric to match the rest of the gifts.
Cute baby canvas with hand sewn fabric frog applique
Handmade fabric babywipes
One of three T-shirts that was dressed up with some fabric applique.


Thursday, October 8, 2009

It started with an invitation


My daughter Annike's 5th birthday is fast approaching but we decided NO PARTY this year! Well I decided no party, Annike had other ideas and has been quietly but persistently been whitling away at my resistance on why she WILL be having a party this year and yes its a good idea to invite lots of friends with a lovely big cake to boot. I compromised, only 6 friends and it will be a BBQ outdoors, no decorations/balloons and NO stress on my part. Yeah right, its already started with some lovely handmade invites for her 7 friends (she managed to sneak an extra friend onto the guest list) which were handed out yesterday. In keeping with the casual/outdoor theme, I was thinking lovely sunny weather (a lottery when you live in Melbourne), homemade lemonade, lots of fruit and picnic blankets.

I found some lovely Tanya Whelan & Cath Kidston fabric and made these adorable envelopes from this website SKEBBA its actually quite simple to make. The name and stamp for each person was printed on some A4 canvas (bought from the $2 shop) and cut out using my scrapbook scissors and then sewed onto each envelope.

The invitation itself was just a simple white broderie anglaise blank card (from the Martha Stewart range) onto which I printed a black and white sketch of some mice playing in the garden with toadstools, which I snitched off the web (hence not showing a photo, incase I get sued lol) The party details were printed inside, easy peasy.

Now I am pondering on what cake to make ;-) and I have paper lanterns, vintage bunting and gingham checks floating in my head, very much like a picnic of yesteryear. But its going to be simple...........with no stress!

Friday, September 11, 2009

How to make a fondant horse

My friend Nat (Dec 04 group) wants to have a pony party for her daughter's 5th birthday this year and was going to google how to make a fondant horse. Well I googled and there are no instructions for a horse. Sheep, mouse, pig and cow yes, horse, nup, so I wipped up this little guy this afternoon to show Nat some of the basics. Hopefully I've explained it properly. Firstly I use Orchard ready made fondant from the supermarket as homemade fondant is too sticky to sculpt with. You'll also need some brown colouring paste (not liquid) I've bought the Wilton brand, a kebab stick, piping tip, paint brush and ball tool.

Split your fondant into 6 balls, 1 large one for the body, a smaller one for the head, two for the legs and 2 for the arms. I've put a dessert spoon next to the balls to show scale. This topper will fit nicely on a 18cm/7 inch round cake.

Roll your legs into two sausage type shapes and use a sharp knife to mark the hooves. You could make a horseshoe out of grey fondant for each leg but I was feeling lazy.

Using your clean paintbrush and some water attach the legs to the body. The trick is not to handle the body parts too much or they loose their shape.

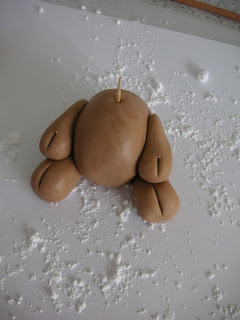
Do the same for the arms, attach to the body with a bit of water and stick a toothpick or a piece of raw spaghetti into the body to act as a support for the head.

Next cut a piece of white fondant with the back end of a piping tip and shape it into the snout of the horse. Attach with a bit of water and use the back of the piping tip to form its mouth. Use a kebab stick to make its mouth if you want the horse to look surprised.

Now use the kebab stick to make two holes in the horses snout to represent the nostrils.

Break off two small pieces of brown fondant and shape into cones. Flatten the cones with a ball tool on one end and squeeze the pointy tip to form the ears. Attach to head with a bit of water.

Take a few bits of fondant, make into thin sausages by rolling between your fingers to represent horse mane. Trim to fit the horses head and attach using some water. Use a toothpick to gently seperate the hair and position it on the head. Tweezers also is a good tool for this.

Viola, a sitting horse (easiest postion to make, and easiest postion to move without breaking) Leave to dry for about 48hrs, do not touch or move it while drying or it will loose its shape.

Thursday, September 10, 2009

Wedding of the year

Well Selina and Brad's wedding is over and I can have a little rest. Phew, what a busy week its been, baking, icing, sewing and more baking. Here is the lovely dress I got to wear on the big day, I was very pleased with how it turned out. My gorgeous dress was bought new from Ebay, Max Azria silk chiffon gown which I upstyled with vintage lace straps, mauve braid around the bustline and mauve and pink crystal beads and pearls on the bodice. It gave the dress a more vintage look to suit the wedding.

Close up of the mini cupcakes I baked. The mini cupcakes were vanilla sponge topped with white vanilla butter cream or cherry cream and topped off with a pink sugar rose, silver caucau and edible gitter.


Selina sent me some unpainted wooden dolls she had bought from Etsy and I used some Jo Sonja paint to re-create her lovely family. This cake topper was to go on the main wedding cake. Aren't they cute? If you aren't artistic or just plain lazy you can actually buy a custom made set from Etsy, but since we were on a budget and since I am not afraid of painting I decided to do them for her.


Here is the strawberry fondant with white choc hearts I made for the lolly buffet. I bought some mini heart silicon pans from a baking shop and first poured in the fondant, let it set and then poured over the cooled white chocolate. They were yummy!


100 minu cupcakes, they lasted all of 5 minutes lol

I apologise that the photo's are all over the place, still haven't worked out how to upload them in the order I want them to appear on my blog.


The completed wedding cake, triple layer caramel mudcake with vanilla butter cream icing topped with the wooden toppers and standing on a vintage crystal cake stand. I am a bit tired of caramel mud ;-) must bake something different next time.


Close up pic of my lovely dress, the flower and ribbon is actually a brooch that you can remove.